【转载请注明出处:http://blog.csdn.net/feiduclear_up CSDN 废墟的树】
1.前言
在Android系统中窗口(Window)分3种类型:利用窗口,子窗口,系统窗口。上1篇博客分析了Android利用窗口Window的创建进程,接下来这篇博客来学习其他两种窗口类型的实现机制。Android开发中常常会使用到Dialog,PopupWindow,Toast等对话框来作为提示信息或和用户交互。但是这些对话框其实都是窗口,它们的创建和移除机制也就是Android系统对窗口的添加和删除的进程了。
这篇博客从源码角度来分析Dialog,PopupWindow,Toast的实现原理。
2.Dialog实现的机制
在Android系统中Dialog对话框是子窗口,也就是Dialog对话框窗口必须要有1个父窗口,那末Dialog对话框窗口的父窗口是谁呢?我不说相信大家也知道了吧!没错就是Activity利用窗口,为何呢?这篇博客来为你解答!
相信很多人平日里用的最多的对话框还是AlertDialog,不过今天它可不是主角,Dialog才是我们今天的重点。其实AlertDialog只是Google官方定制了很多不同主题不同布局的Dialog而已,AlertDialog继承自Dialog类。因此我们只分析Dialog的实现机制。使用对话框都是在Activity中,因此在Activity中创建最简单的Dialog对话框代码以下:
Dialog dialog = new Dialog(MainActivity.this) dialog.setContentView(R.layout.dialog) dialog.show() //取消对话框
dialog.cancel()
以上是最简单的对话框使用示例,先创建1个Dialog对象实例,然后Dialog加载布局,最后调用show方法来显示该对话框,当用户按“back”键时系统会自动调用cancel方法来移除Dialog对话框窗口。现在我们就就从以上几个进程来详细分析Dialog创建进程。
2.1Dialog对话框创建
来看看Dialog类的构造方法实现代码以下:
public class Dialog implements DialogInterface, Window.Callback, KeyEvent.Callback, OnCreateContextMenuListener, Window.OnWindowDismissedCallback { ................. public Dialog(Context context) { this(context, 0, true);
} Dialog(Context context, int theme, boolean createContextThemeWrapper) { if (createContextThemeWrapper) { if (theme == 0) {
TypedValue outValue = new TypedValue(); context.getTheme().resolveAttribute(com.android.internal.R.attr.dialogTheme,
outValue, true);
theme = outValue.resourceId;
} mContext = new ContextThemeWrapper(context, theme);
} else {
mContext = context;
} mWindowManager = (WindowManager)context.getSystemService(Context.WINDOW_SERVICE); final Window w = new PhoneWindow(mContext);
mWindow = w; w.setCallback(this); w.setOnWindowDismissedCallback(this); w.setWindowManager(mWindowManager, null, null); w.setGravity(Gravity.CENTER);
mListenersHandler = new ListenersHandler(this);
}
}
分析:
在Dilaog的构造方法中主要做了以下工作:
-
根据参数createContextThemeWrapper的值来决定是使用参数theme指定的主题还是使用其父窗口Activity的主题。
-
调用Context#getSystemService方法取得当前利用的窗口管理器WindowManager对象,有上1篇博客知道:1个利用不管有多少个Activity都只有1个WindowManager对象用于管应当前利用中的所有窗口。
-
为Dialog对话框创建1个窗口Window对象,Window是个抽象类,其实现指向PhoneWindow类。
-
给窗口设置事件回调监听,由于在Dialog类中实现了Window#Callback接口类,该接口类目的是让Dialog对话框的窗口具有处理响应按键触摸事件的能力,这也就是为何用户默许创建的Dialog对话框可以响应“Back”回退按键事件和点击对话框窗口之外的地方Dialog对话框会自动消失隐藏。由此可知,Dialog和Activity都实现了消息处理。
-
设置Window类的内部成员变量值WindowManager,由此知道Window的WindowManager和Dilaog的WindowManager指向同1个对象。
-
设置当前Dialog窗口的对齐方式为居中,这就是为何我们默许的对话框都是居中显示了吧。
-
创建对话框的事件监听对象,用于对话框显示,消失,取消时的1些监听操作。
Dialog内部创建了1个Window对象,窗口是1个抽象的东西,和Activity利用窗口1样,需要往窗口Window中添加视图View来显示内容。因此调用setContentView方法来加载对话框的布局视图。
2.2Dialog加载布局
Dialog#setContentView源码以下:
public void setContentView(int layoutResID) {
mWindow.setContentView(layoutResID);
}
分析:
该方法将操作转发给Window类中的setContentView方法,但是mWindow对象是指向PhoneWindow类的,也就是调用PhoneWindow类中的setContentView方法。到此处我们发现Dialog加载布局的流程和Activity加载布局的流程是1样的。因此这里就不仔细分析了,可以参考上1篇博客。到此,Dialog对话框窗口Window内部就已添加了视图DecorView了。那末剩下的事就是Dilaog对话框怎样显示在手机屏幕上了。
2.3 Dialog的显示
在创建完Dialog对话框以后我们仅仅调用Dialog#show方法就能够让该对话框显示在当前Activity上。
Dilaog#show源码以下:
public void show() { if (mShowing) { if (mDecor != null) { if (mWindow.hasFeature(Window.FEATURE_ACTION_BAR)) {
mWindow.invalidatePanelMenu(Window.FEATURE_ACTION_BAR);
}
mDecor.setVisibility(View.VISIBLE);
} return;
} mCanceled = false; if (!mCreated) {
dispatchOnCreate(null);
} onStart(); mDecor = mWindow.getDecorView(); if (mActionBar == null && mWindow.hasFeature(Window.FEATURE_ACTION_BAR)) { final ApplicationInfo info = mContext.getApplicationInfo();
mWindow.setDefaultIcon(info.icon);
mWindow.setDefaultLogo(info.logo);
mActionBar = new WindowDecorActionBar(this);
}
WindowManager.LayoutParams l = mWindow.getAttributes(); if ((l.softInputMode
& WindowManager.LayoutParams.SOFT_INPUT_IS_FORWARD_NAVIGATION) == 0) {
WindowManager.LayoutParams nl = new WindowManager.LayoutParams();
nl.copyFrom(l);
nl.softInputMode |=
WindowManager.LayoutParams.SOFT_INPUT_IS_FORWARD_NAVIGATION;
l = nl;
} try { mWindowManager.addView(mDecor, l); mShowing = true; sendShowMessage();
} finally {
}
}
分析:
在show方法里主要做了以下几件工作:
-
判断当前Dialog对话框窗口是存在,如果存在直接让其显示便可;如果当前窗口不存在,则调用Dialog的回调方法onCreate方法,用户可以在onCreate回调方法中创建1个新的Dialog对话框。
-
取得Dialog对话框的顶层视图DecorView对象赋值给成员变量mDecor用于addView方法的参数。
-
根据条件为当前对话框窗口设置导航栏logo图标等。
-
取得当前窗口的参数属性赋值给l,用于addView方法的参数。
-
调用WindowManager#addView方法添加Dialog对话框窗口。
自此Dialog对话框的添加进程已完成了,回过头来会发现,其实Dialog对话框窗口的创建添加进程和Activity利用窗口进程是1样1样的。
2.4 移除Dialog对话框
移除或隐藏对话框的代码也很简单。用户仅仅调用Dialog#cancel方法就能够移除当前Activity之上的对话框了。
public void cancel() { if (!mCanceled && mCancelMessage != null) {
mCanceled = true; Message.obtain(mCancelMessage).sendToTarget();
}
dismiss();
}
该方法也很简单,先发送移除Dialog时的监听事件,以后将操作转发到dismiss方法中。
/**
* Dismiss this dialog, removing it from the screen. This method can be
* invoked safely from any thread. Note that you should not override this
* method to do cleanup when the dialog is dismissed, instead implement
* that in {@link #onStop}.
*/ @Override public void dismiss() { if (Looper.myLooper() == mHandler.getLooper()) { dismissDialog();
} else { mHandler.post(mDismissAction);
}
}
分析:
注释解释的很清楚了:该方法可以安全的在任何线程中调用,也就是说可以在子线程中移除对话框而不报错。Looper.myLooper()方法取得的Looper对象是当前线程的Looper,而mHandler.getLooper()方法取得的Looper对象是mHandler所在线程的Looper。由于Android系统规定只要有关UI操作都必须在主线程中,而我们在创建Dialog是在主线程中,mHandler对象是在主线程中创建的,因此mHandler.getLooper()就是主线程的Looper。
以上代码:如果当前线程为主线程,则调用dismissDialog方法,如果是子线程,则利用Handler将此操作发送到UI线程中操作。
1.在主线程中移除对话框
void dismissDialog() { if (mDecor == null || !mShowing) { return;
} if (mWindow.isDestroyed()) {
Log.e(TAG, "Tried to dismissDialog() but the Dialogs window was already destroyed!"); return;
} try { mWindowManager.removeViewImmediate(mDecor);
} finally { if (mActionMode != null) {
mActionMode.finish();
}
mDecor = null;
mWindow.closeAllPanels(); onStop(); mShowing = false; sendDismissMessage();
}
}
分析:
-
如果当前Dialog窗口的视图DecorView为空或当前窗口不存在,则不做任何处理,直接退出当前方法便可。
-
如果当前Dialog窗口已被烧毁了也不做任何处理。
-
调用WindowManager#removeView方法来移除当前对话框窗口。
该方法主要作用就是从Activity的窗口管理器mWindowManager中移除对话框窗口的视图,也就是完成了该对话框的移除操作。
2.在子线程中调用Dialog#cancel
当子线程调用时就会履行 mHandler.post(mDismissAction)代码。该代码的作用就是将操作转发到主线程中。我们看看mDismissAction的实现以下:
private final Runnable mDismissAction = new Runnable() { public void run() {
dismissDialog();
}
};
该类很简单,仅仅实现了run回调方法,然后调用了dismissDialog方法。
2.5 Dialog 触摸事件处理
我们知道Dialog默许是响应“Back”返回键当前对话框消失事件和点击Dialog对话框视图之外的地方当前对话框也会消失,而默许的PopupWindow对话框是不支持以上两种事件操作的。那末为何会是这样呢?此处先分析Dialog对触摸事件的处理,下1节分PopupWindow不支持事件处理的缘由。
响应“Back”返回键
public class Dialog implements DialogInterface, Window.Callback, KeyEvent.Callback, OnCreateContextMenuListener, Window.OnWindowDismissedCallback { ........ public boolean onKeyUp(int keyCode, KeyEvent event) { if (keyCode == KeyEvent.KEYCODE_BACK && event.isTracking()
&& !event.isCanceled()) {
onBackPressed(); return true;
} return false;
}
........ public void onBackPressed() { if (mCancelable) {
cancel();
}
}
}
分析:
在Dialog类中实现了按键事件KeyEvent.Callback接口类,因此当有用户按键输入事件产生时就会调用KeyEvent.Callback接口类中的相应方法。当按键操作有“抬起”的操作行动时,系统会调用onKeyUp方法。而Dialog类中的onKeyUp方法中会检查当前按键事件是不是为“KeyEvent.KEYCODE_BACK”事件,且当前输入事件没有被取消,那末会调用onBackPressed,而该方法中判断如果当前对话框可以被取消则调用cancel方法来取消或隐藏当前对话框。因此Dialog也就响应了“Back”按键事件以后对话框消失。
Dialog点击对话框视图之外的地方消失
public class Dialog implements DialogInterface, Window.Callback, KeyEvent.Callback, OnCreateContextMenuListener, Window.OnWindowDismissedCallback { ........ public boolean dispatchTouchEvent(MotionEvent ev) { if (mWindow.superDispatchTouchEvent(ev)) { return true;
} return onTouchEvent(ev);
}
........
}
分析:
Dialog类一样也实现了Window.Callback接口事件,同时调用Window#setCallback方法设置了该事件的回调,因此Dialog也一样具有响应触摸事件的功能。当用户点击手机屏幕时,就系统就会自动调用dispatchTouchEvent方法来分发当前窗口的触摸事件。该方法前后做了两件事情:
-
先调用Dialog的窗口Window对象的方法Window#superDispatchTouchEvent来处理触摸按键事件。
-
如果Window窗口的触摸按键事件处理返回为false,则调用Dialog#onTouchEvent方法来继续处理触摸按键事件。
有关触摸事件传递机制请参考这篇博客:Android事件分发机制完全解析,带你从源码的角度完全理解(上)。
当用户点击Dialog窗口视图之外的地方时,最后时会履行Dialog#onTouchEvent方法的,感兴趣的同学可以自行研究下!那末我们来看看Dialog#onTouchEvent方法源码以下:
public boolean onTouchEvent(MotionEvent event) { if (mCancelable && mShowing && mWindow.shouldCloseOnTouch(mContext, event)) {
cancel(); return true;
} return false;
}
分析:
该方法也很简单,如果if条件满足,则直接调用cancel方法来取消当前对话框,if条件不满足时不做任何处理直接返回。那末我们来看看甚么情况下if添加满足致使了调用cancel方法取消对话框。必须满足3个条件:当前对话框可以被取消,对话框正在显示,和Window.shouldCloseOnTouch方法返回true。前两个条件默许都满足,那末来看看第3个条件甚么情况下满足吧!
Window.shouldCloseOnTouch源码以下:
/** @hide */ public boolean shouldCloseOnTouch(Context context, MotionEvent event) { if (mCloseOnTouchOutside && event.getAction() == MotionEvent.ACTION_DOWN
&& isOutOfBounds(context, event) && peekDecorView() != null) { return true;
} return false;
}
分析:
该方法需要满足4个条件才会返回true。
-
布尔变量mCloseOnTouchOutside:表示是不是支持点击窗口之外的地方窗口可消失。Dialog对话框的窗口默许支持,也就是该条件满足。如果想修改该条件,你可以调用Dialog#setCanceledOnTouchOutside(false)方法来到达点击窗口之外的地方Dialog消失,其实终究是设置mCloseOnTouchOutside变量为false,然后致使shouldCloseOnTouch方法返回false。
-
当前触摸事件是不是为“MotionEvent.ACTION_DOWN”手指按下事件,自然满足。
-
调用isOutOfBounds方法判断当前手指导击的坐标是不是在Dialog对话框窗口视图以外?
-
当前Dialog对话框窗口是不是添加了视图DecorView?如果对话框显示出来了,自然窗口DecorView对象不为空。
因此有上面4个条件分析我们得知:只有当isOutOfBounds方法返回true时,条件才成立,shouldCloseOnTouch方法返回值才为true,手指导击Dialog窗口以外的地方Dialog才会消失。所以主要看isOutOfBounds方法的实现了。
Window#isOutOfBounds源码以下:
private boolean isOutOfBounds(Context context, MotionEvent event) { final int x = (int) event.getX(); final int y = (int) event.getY(); final int slop = ViewConfiguration.get(context).getScaledWindowTouchSlop(); final View decorView = getDecorView(); return (x < -slop) || (y < -slop) || (x > (decorView.getWidth()+slop))
|| (y > (decorView.getHeight()+slop));
}
此方法实现也很简单,判断当前手指按下点击屏幕的坐标x,y是不是在Window窗口的视图DecorView宽度高度以外,如果是,则返回true,否则返回false。
至此:有关Dialog响应“Back”返回按键事件和点击Dialog窗口以外的地方Dialog自动消失事件分析完成了。其实这1块的原理和Activity处理“Back”返回键当前Activity会调用finish方法1样。
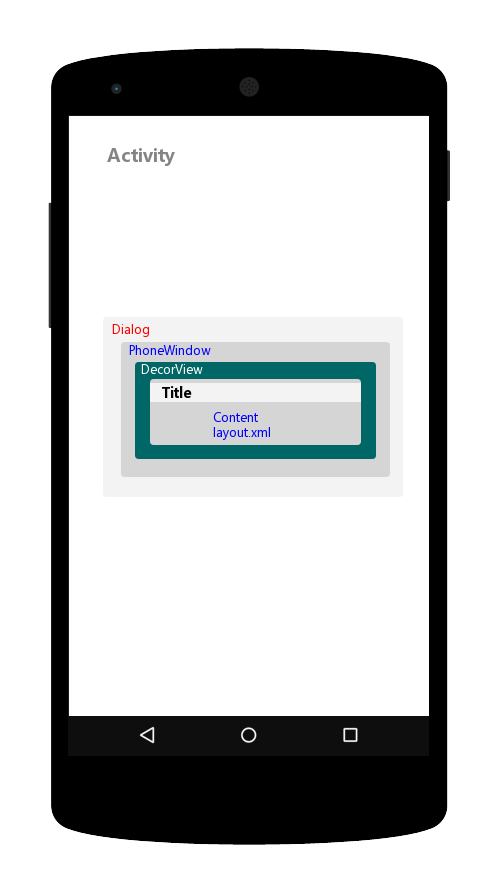
Dialog总结:
Dialog对话框窗口Window的实现机制和Activity1样。Dialog有1个Window对象,该对象属于PhoneWindow类型用于描写Dialog对话框窗口;PhoneWindow类有1个内部类DecorView,用于描写当前窗口的顶层视图。一样Dialog也实现了Window.Callback接口回调,以便Dialog也能够处理用户的触摸和按键事件。
Dialog窗口Window视图View层次关系图以下:
开发中用的最多的对话框AlertDialog,如果需要定制自己的对话框风格或AlertDialog没法满足你的需求时,就能够斟酌下PopupWindow对话框了。弹出式对话框PopupWinsow的使用也很简单,仅仅调用已下几行代码就可以实现最简单的对话框了!
//取得父窗口视图中的某个View对象
View parentView = findViewById(R.id.main) //加载popupWindow对话框布局
View popWindow = LayoutInflater.from(MainActivity.this).inflat(R.layout.dialog, null) //创建对话框
PopupWindow pw = new PopupWindow(popWindow,ViewGroup.LayoutParams.MATCH_PARENT,
ViewGroup.LayoutParams.WRAP_CONTENT, true) //显示对话框
pw.showAtLocation(parentView, Gravity.CENTER, 0, 0) //移除对话框
pw.dismiss()
分析:
使用PopupWindow弹出式对话框主要以下几个步骤:
1. 取得父窗口中的某1个View对象
2. 加载对话框视图布局文件
3. 创建对话框实例
4. 显示该对话框
5. 移除对话框
我们从PopupWindow类中的构造方法开始分析
PopupWindow构造方法源码以下:
public PopupWindow(View contentView, int width, int height, boolean focusable) { if (contentView != null) { mContext = contentView.getContext(); mWindowManager = (WindowManager) mContext.getSystemService(Context.WINDOW_SERVICE);
} setContentView(contentView); setWidth(width); setHeight(height); setFocusable(focusable);
}
分析:
PopupWindow构造方法中主要做了以下几个工作:
-
取得父窗口的context对象,也就是当前Activity的Context对象,然后有context对象取得全部利用的WindowManager对象,从上1篇博客知道:1个利用只有唯逐一个WindowManager对象用于管理全部利用的窗口。
-
设置对话框布局,该操作主要是将对话框视图赋值给PopupWindow类的成员变量mContentView。
-
分别设置对话框布局的宽度,高度,和取得 焦点的能力。这3个方法的主要操作还是对PopupWindow类中的成员变量mWidth,mHeight,mFocusable赋值,以便对话框显示的时候使用。
PopupWindow对话框创建完成,接下来看看怎样来显示它。
PopupWindow对话框显示的方法有两种:
-
showAtLocation
-
showAsDropWown
其实这两种方法实现的原理是相同的,仅仅是显示的位置控制不1样而已,因此这里就分析其中1个方法showAtLocation实现的原理。
PopupWindow#showAtLocation源码以下:
public void showAtLocation(View parent, int gravity, int x, int y) {
showAtLocation(parent.getWindowToken(), gravity, x, y);
}
该方法仅仅将操作转发给同名方法,只是利用第1个参数parent来取得父窗口的标识符token对象,但是,父窗口Window视图中的任何1个View得到的标识符都是同1个对象。因此在构建parent参数的时候只要满足1个条件就能够了:那就是参数parent只要是对话框所依赖的父类窗口中的其中1个子View便可,也就是Activity布局中的任何1个子View都可以作为PopupWindow类中showAtLocation方法的第1个参数。
同名方法showAtLocation源码以下:
public void showAtLocation(IBinder token, int gravity, int x, int y) { if (isShowing() || mContentView == null) { return;
}
unregisterForScrollChanged(); mIsShowing = true;
mIsDropdown = false; WindowManager.LayoutParams p = createPopupLayout(token); p.windowAnimations = computeAnimationResource(); preparePopup(p); if (gravity == Gravity.NO_GRAVITY) {
gravity = Gravity.TOP | Gravity.START;
}
p.gravity = gravity; p.x = x;
p.y = y; if (mHeightMode < 0) p.height = mLastHeight = mHeightMode; if (mWidthMode < 0) p.width = mLastWidth = mWidthMode; invokePopup(p);
}
以上方法主要做了3件事:
-
创建对话框窗口布局参数
-
创建对话框窗口的视图
-
添加对话框窗口的进程
我们顺次来分析以上3步:
1.创建窗口参数:
PopupWindow#createPopupLayoutParams源码以下:
private WindowManager.LayoutParams createPopupLayoutParams(IBinder token) { final WindowManager.LayoutParams p = new WindowManager.LayoutParams(); p.gravity = Gravity.START | Gravity.TOP; p.flags = computeFlags(p.flags); p.type = mWindowLayoutType; p.token = token; p.softInputMode = mSoftInputMode; p.windowAnimations = computeAnimationResource(); if (mBackground != null) {
p.format = mBackground.getOpacity();
} else {
p.format = PixelFormat.TRANSLUCENT;
} if (mHeightMode < 0) {
p.height = mLastHeight = mHeightMode;
} else {
p.height = mLastHeight = mHeight;
} if (mWidthMode < 0) {
p.width = mLastWidth = mWidthMode;
} else {
p.width = mLastWidth = mWidth;
} return p;
}
分析:
该方法主要是设置对话框的 gravity(对齐方式),flag(窗口特点),type(窗口类型),softInputMode (软输入法模式),windowAnimations(窗口相干动画),width,height等参数。
2.创建对话框视图
API22 PopupWindow#preparePopup源码以下:
private void preparePopup(WindowManager.LayoutParams p) { if (mContentView == null || mContext == null || mWindowManager == null) { throw new IllegalStateException("You must specify a valid content view by " + "calling setContentView() before attempting to show the popup.");
} if (mBackground != null) { final ViewGroup.LayoutParams layoutParams = mContentView.getLayoutParams(); int height = ViewGroup.LayoutParams.MATCH_PARENT; if (layoutParams != null &&
layoutParams.height == ViewGroup.LayoutParams.WRAP_CONTENT) {
height = ViewGroup.LayoutParams.WRAP_CONTENT;
}
PopupViewContainer popupViewContainer = new PopupViewContainer(mContext);
PopupViewContainer.LayoutParams listParams = new PopupViewContainer.LayoutParams(
ViewGroup.LayoutParams.MATCH_PARENT, height
);
popupViewContainer.setBackground(mBackground);
popupViewContainer.addView(mContentView, listParams);
mPopupView = popupViewContainer;
} else { mPopupView = mContentView;
} mPopupView.setElevation(mElevation);
mPopupViewInitialLayoutDirectionInherited =
(mPopupView.getRawLayoutDirection() == View.LAYOUT_DIRECTION_INHERIT);
mPopupWidth = p.width;
mPopupHeight = p.height;
}
分析:
有以上代码我们发现在创建对话框窗口视图进程中有两种情况
-
窗口背景mBackground不为空。
-
窗口背景mBackground为空。
而我们知道在PopupWindow类中成员变量mBackground默许是为空的,只有调用setBackgroundDrawable方法才能修改mBackground成员变量的值,也就是为PopupWindow对话框设置背景。
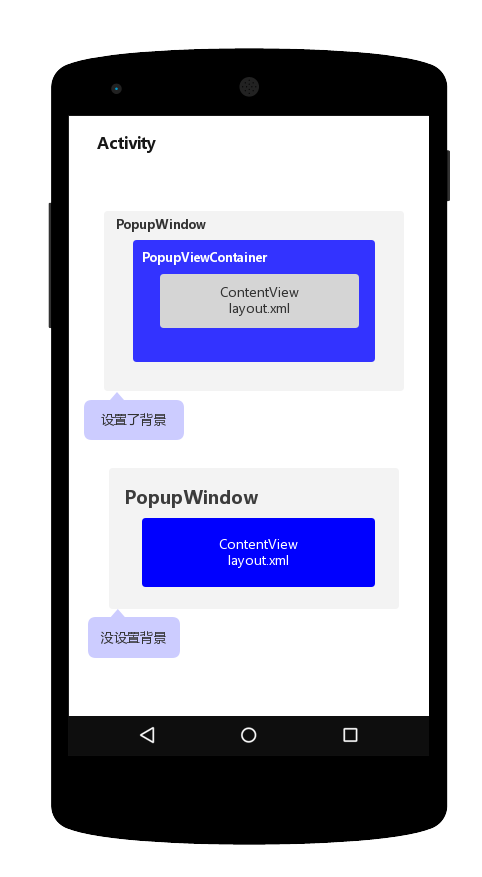
当窗口背景mBackground不为空时,if条件满足,先创建PopupViewContainer对象,该对象是FrameLayout类型。然后将窗口布局视图mContentView添加到popupViewContainer视图上,也就是PopupViewContainer类作为父类视图来添加窗口的布局视图mContentView。也就是当前对话框窗口视图mContentView外面还包裹着1成PopupViewContainer。那末我们来看看PopupViewContainer做了甚么工作。
private class PopupViewContainer extends FrameLayout { private static final String TAG = "PopupWindow.PopupViewContainer"; public PopupViewContainer(Context context) { super(context);
} @Override protected int[] onCreateDrawableState(int extraSpace) { if (mAboveAnchor) { final int[] drawableState = super.onCreateDrawableState(extraSpace + 1);
View.mergeDrawableStates(drawableState, ABOVE_ANCHOR_STATE_SET); return drawableState;
} else { return super.onCreateDrawableState(extraSpace);
}
} @Override public boolean dispatchKeyEvent(KeyEvent event) { if (event.getKeyCode() == KeyEvent.KEYCODE_BACK) { if (getKeyDispatcherState() == null) { return super.dispatchKeyEvent(event);
} if (event.getAction() == KeyEvent.ACTION_DOWN
&& event.getRepeatCount() == 0) {
KeyEvent.DispatcherState state = getKeyDispatcherState(); if (state != null) {
state.startTracking(event, this);
} return true;
} else if (event.getAction() == KeyEvent.ACTION_UP) {
KeyEvent.DispatcherState state = getKeyDispatcherState(); if (state != null && state.isTracking(event) && !event.isCanceled()) { dismiss(); return true;
}
} return super.dispatchKeyEvent(event);
} else { return super.dispatchKeyEvent(event);
}
} @Override public boolean dispatchTouchEvent(MotionEvent ev) { if (mTouchInterceptor != null && mTouchInterceptor.onTouch(this, ev)) { return true;
} return super.dispatchTouchEvent(ev);
} @Override public boolean onTouchEvent(MotionEvent event) { final int x = (int) event.getX(); final int y = (int) event.getY(); if ((event.getAction() == MotionEvent.ACTION_DOWN)
&& ((x < 0) || (x >= getWidth()) || (y < 0) || (y >= getHeight()))) {
dismiss(); return true;
} else if (event.getAction() == MotionEvent.ACTION_OUTSIDE) {
dismiss(); return true;
} else { return super.onTouchEvent(event);
}
} @Override public void sendAccessibilityEvent(int eventType) { if (mContentView != null) {
mContentView.sendAccessibilityEvent(eventType);
} else { super.sendAccessibilityEvent(eventType);
}
}
}
}
PopupViewContainer 继承自FrameLayout是1个ViewGroup是图组,然后你会发现其实该类里面并没有实现甚么逻辑处理,仅仅是重写了dispatchKeyEvent和dispatchTouch按键和触摸事件分发而已。而你会发现在按键和触摸事件方法里面处理了点击PopupWindow对话框以外的像素位置时,对话框调用了dismiss方法,也就是移除对话框。并且处理了按返回键时对话框移除的事件,一样当用户按back键时也调用了dismiss方法。这就是为何PopupWindow在默许情况下是不响应back事件和点击对话框以外的地方PopupWindow是不消失的。所以,如果你想要你的PopupWindow类型的对话框能像Dialog1样响应back和点击对话框之外的地方消失,你就能够调用PopupWindow#setBackgroundDrawable方法来实现了。
当用户没有设置窗口背景也就是没有调用PopupWindow#setBackgroundDrawable方法时mBackground为空,那末当前窗口的视图就直接是mContentView了。但是所有View默许的按键和触摸事件是没有处理back事件和点击对话框以外的地方对话框消失的处理的。因此,使用PopupWindow对话框不设置对话框背景时是不响应“back”返回按键和点击窗口以外的地方消失的。
3.3添加对话框窗口进程
PopupWindow#invokePopup源码以下:
private void invokePopup(WindowManager.LayoutParams p) { if (mContext != null) {
p.packageName = mContext.getPackageName();
}
mPopupView.setFitsSystemWindows(mLayoutInsetDecor);
setLayoutDirectionFromAnchor();
mWindowManager.addView(mPopupView, p);
}
分析:
该方法也很简单,主要是调用了WindowManager#addView方法来添加对话框视图。从而PopupWindow对话框显示在Activity利用窗口之上了。
3.4移除对话框
public void dismiss() { if (isShowing() && mPopupView != null) { mIsShowing = false;
unregisterForScrollChanged(); try {
从Activity上移除对话框视图
mWindowManager.removeViewImmediate(mPopupView);
} finally { if (mPopupView != mContentView && mPopupView instanceof ViewGroup) { ((ViewGroup) mPopupView).removeView(mContentView);
}
mPopupView = null; if (mOnDismissListener != null) {
mOnDismissListener.onDismiss();
}
}
}
}
分析:
移除对话框的进程和Dialog移除对话框相识,这里不仔细分析了。
自此PopupWindow对话框的创建,添加,移除的进程已分析完成了。其主要流程就是取得当前利用程序的WindowManager对象,然后将对话框的视图添加到WindowManager上来显示PopupWindow对话框,调用WindowManager#remove方法移除对话框视图来到达移除当前对话框。所以PopupWindow类型的对话框必须要依附在某1个Activity之上,也就是PopupWindow是1个子窗口。
Dialog对话框和PopupWindow对话框最主要的区分就是Dialog窗口内部具有1个PhoneWindow对象来处理了输入事件,而PopupWindow窗口内部没有PhoneWindow对象来理输入事件。这也就致使了Dialog能响应“Back”返回键对话框消失和点击对话框以外的地方对话框消失而PopupWindow不能的缘由。
PopupWindow对话框窗口视图关系以下:
4.Toast显示的机制
Toast也常常使用,而且使用简单,仅仅需要以下1行代码便可实现吐司效果
Toast.makeText(MainActivity.this, "Toast", Toast.LENGTH_SHORT).show()
其实分两步调用,Toast#makeText,Toast#show。
4.1Toast#makeText
public static Toast makeText(Context context, CharSequence text, @Duration int duration) {
Toast result = new Toast(context) LayoutInflater inflate = (LayoutInflater)
context.getSystemService(Context.LAYOUT_INFLATER_SERVICE) View v = inflate.inflate(com.android.internal.R.layout.transient_notification, null) TextView tv = (TextView)v.findViewById(com.android.internal.R.id.message) tv.setText(text) result.mNextView = v result.mDuration = duration return result }
分析:首先调用Toast的构造方法,然后加载Toast布局视图,将布局视图和Toast显示时间参数赋值给Toast类的成员变量mNextView和mDuration。
4.2Toast构造方法
public Toast(Context context) {
mContext = context mTN = new TN() mTN.mY = context.getResources().getDimensionPixelSize( com.android.internal.R.dimen.toast_y_offset) mTN.mGravity = context.getResources().getInteger( com.android.internal.R.integer.config_toastDefaultGravity) }
Toast构造方法也很简单,new了1个内部类TN,然后给TN类中的成员变量mY和mGravity赋值。那末主要的操作就在内部类TN的构造方法了。
Toast#TN构造方法
private static class TN extends ITransientNotification.Stub {
private final WindowManager.LayoutParams mParams = new WindowManager.LayoutParams() ......
TN() {
// XXX This should be changed to use a Dialog, with a Theme.Toast // defined that sets up the layout params appropriately.
final WindowManager.LayoutParams params = mParams //Toast高度
params.height = WindowManager.LayoutParams.WRAP_CONTENT //Toast宽度
params.width = WindowManager.LayoutParams.WRAP_CONTENT params.format = PixelFormat.TRANSLUCENT //Toast入场动画
params.windowAnimations = com.android.internal.R.style.Animation_Toast //Toast窗口类型
params.type = WindowManager.LayoutParams.TYPE_TOAST //标题
params.setTitle("Toast") //窗口特点标记符
params.flags = WindowManager.LayoutParams.FLAG_KEEP_SCREEN_ON
| WindowManager.LayoutParams.FLAG_NOT_FOCUSABLE
| WindowManager.LayoutParams.FLAG_NOT_TOUCHABLE }
}
TN类的构造方也很简单,仅仅是创建了布局参数mParams并且赋值操作。
4.3Toast#show
public void show() { if (mNextView == null) { throw new RuntimeException("setView must have been called");
} INotificationManager service = getService();
String pkg = mContext.getOpPackageName();
TN tn = mTN;
tn.mNextView = mNextView; try {
service.enqueueToast(pkg, tn, mDuration);
} catch (RemoteException e) { }
}
......... private static INotificationManager sService; static private INotificationManager getService() { if (sService != null) { return sService;
}
sService = INotificationManager.Stub.asInterface(ServiceManager.getService("notification")); return sService;
}
分析:在该方法中主要作用就是调用远程服务NotificationManagerService中的enqueueToast方法将Toast的内部类TN对象入队列的1个进程。进入NotificationManagerService类的enqueueToast方法看看
public class NotificationManagerService extends SystemService { .............
private final IBinder mService =
new INotificationManager.Stub() {
@Override
public void enqueueToast(String pkg, ITransientNotification callback,
int duration)
{
if (pkg ==
null || callback ==
null) {
Slog.e(TAG,
"Not doing toast. pkg=" + pkg +
" callback=" + callback);
return ;
}
final boolean isSystemToast = isCallerSystem() || (
"android".equals(pkg));
if (ENABLE_BLOCKED_TOASTS && !noteNotificationOp(pkg, Binder.getCallingUid())) {
if (!isSystemToast) {
Slog.e(TAG,
"Suppressing toast from package " + pkg +
" by user request.");
return;
}
}
synchronized (mToastQueue) {
int callingPid = Binder.getCallingPid();
long callingId = Binder.clearCallingIdentity();
try {
ToastRecord record;
int index = indexOfToastLocked(pkg, callback);
if (
index >=
0) {
record = mToastQueue.get(
index);
record.update(duration);
}
else {
if (!isSystemToast) {
int count =
0;
final int N = mToastQueue.size();
for (
int i=
0; i
final ToastRecord r = mToastQueue.get(i); if (r.pkg.equals(pkg)) { count++; if (count >= MAX_PACKAGE_NOTIFICATIONS) {
Slog.e(TAG, "Package has already posted " + count + " toasts. Not showing more. Package=" + pkg); return;
}
}
}
} record = new ToastRecord(callingPid, pkg, callback, duration); mToastQueue.add(record); index = mToastQueue.size() - 1; keepProcessAliveLocked(callingPid);
} if (index == 0) {
showNextToastLocked();
}
} fina
生活不易,码农辛苦
如果您觉得本网站对您的学习有所帮助,可以手机扫描二维码进行捐赠

------分隔线----------------------------
------分隔线----------------------------


