本教程基于中国科学院大学研究生课程(高级软件工程)。此教程做出的基础版Demo,代码位于Github。 教程合适新入门的Ruby on Rails开发者,入门者可以在基础版上增加新的功能:
Rails在众多Web开发语言中还是属于门坎比较高的,由于其本地的环境搭建比较麻烦,特别在是windows系统下。而在Mac OS、Linux等系统中却得到较好的支持。所以此教程基于Linux或Mac系统。
除本地搭建环境,还可以选择例如Cloud9类似的云IDE,使用这些云IDE可以避免除在本地搭建环境的烦恼,只要能上网电脑,都能通过网页访问云IDE,在线编辑代码并运行。
但是在云端编辑代码的IDE1般没有本地下载的IDE强,比如Jetbeans公司的产品RubyMine神器,就是目前Ruby最智能的IDE,能与Java语言的Eclipse、Netbeans相媲美。Jetbeans公司除Ruby语言的IDE,还有Python语言的PyCharm和PHP语言的PHPStorm等,都是极好的集成开发环境,支持断点调试Debug,自动代码纠错、排版等功能。惋惜软件收费,但是学生和老师通过学校的邮箱申请还是可以取得1年的免费使用。
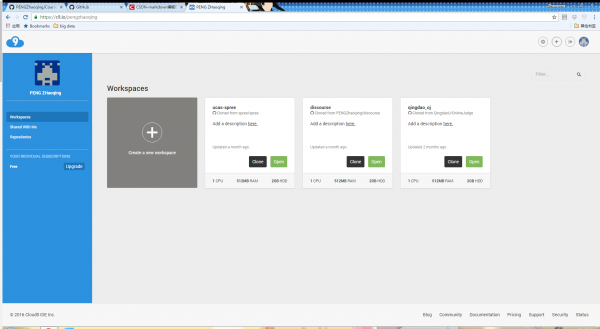
1.下面以Cloud9开发为例子,首先注册然后登陆,会看到以下界面:
2.点击创建新的工作空间,跳转以下界面:
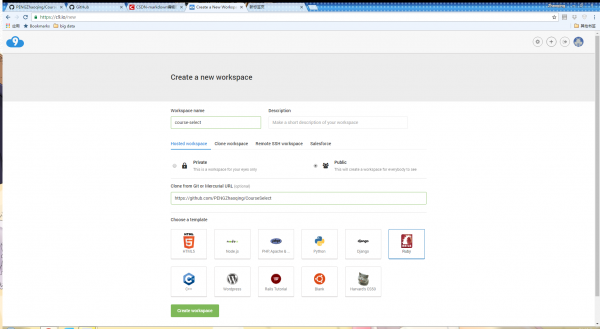
注意:在Clone from Git的网址那里的url请填写fork后的分支url,例如https://github.com/你的github账号名字/CourseSelect。填好项目名字,然后将项目语言选为Ruby就能够点击创建了。
3.进入IDE编辑页面:
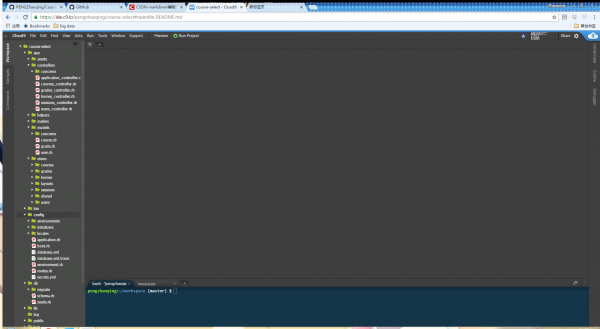
左侧为项目的目录,右上为文件的编辑窗口,右下为终端(输入命令行的地方)。
4.在终端中输入bundle install,安装项目需要的外部库(Rails中把这些库称为Gems),看到以下的结果表示所有依赖的库都安装终了:
pengzhaoqing:~/workspace (master) $ bundle install
Fetching gem metadata from https://gems.ruby-china.org/...........
Fetching version metadata from https://gems.ruby-china.org/..
Using rake 11.2.2
Using i18n 0.7.0
Using json 1.8.3
Using minitest 5.9.0
Using thread_safe 0.3.5
Using builder 3.2.2
Using erubis 2.7.0
Using mini_portile2 2.1.0
Using pkg-config 1.1.7
Using rack 1.6.4
Using mime-types-data 3.2016.0521
Using arel 6.0.3
Using execjs 2.7.0
Installing bcrypt 3.1.11 with native extensions
Using debug_inspector 0.0.2
Using sass 3.4.22
Using byebug 9.0.5
Using coffee-script-source 1.10.0
Using thor 0.19.1
Using concurrent-ruby 1.0.2
Using tilt 2.0.5
Using multi_json 1.12.1
Installing nested_form 0.3.2
Installing pg 0.18.4 with native extensions
Using bundler 1.12.5
Installing rails_serve_static_assets 0.0.5
Installing rails_stdout_logging 0.0.5
Installing remotipart 1.2.1
Installing safe_yaml 1.0.4
Using spring 1.7.2
Using turbolinks-source 5.0.0
Installing faker 1.6.3
Using rdoc 4.2.2
Using tzinfo 1.2.2
Using nokogiri 1.6.8
Using rack-test 0.6.3
Using mime-types 3.1
Installing autoprefixer-rails 6.4.0.2
Installing uglifier 3.0.1
Using binding_of_caller 0.7.2
Using coffee-script 2.4.1
Using sprockets 3.7.0
Installing haml 4.0.7
Installing rails_12factor 0.0.3
Using turbolinks 5.0.1
Using sdoc 0.4.1
Installing activesupport 4.2.5.2
Using loofah 2.0.3
Installing rack-pjax 0.8.0
Using mail 2.6.4
Installing bootstrap-sass 3.3.7
Using rails-deprecated_sanitizer 1.0.3
Using globalid 0.3.7
Installing activemodel 4.2.5.2
Using jbuilder 2.6.0
Using rails-html-sanitizer 1.0.3
Using rails-dom-testing 1.0.7
Installing activejob 4.2.5.2
Installing activerecord 4.2.5.2
Installing actionview 4.2.5.2
Installing actionpack 4.2.5.2
Installing actionmailer 4.2.5.2
Installing railties 4.2.5.2
Installing kaminari 0.16.3
Using sprockets-rails 3.1.1
Using coffee-rails 4.1.1
Installing font-awesome-rails 4.5.0.1
Installing jquery-rails 4.1.1
Installing jquery-ui-rails 5.0.5
Installing rails 4.2.5.2
Using sass-rails 5.0.6
Using web-console 2.3.0
Installing rails_admin 0.8.1
Bundle complete! 17 Gemfile dependencies, 73 gems now installed.
Use `bundle show [gemname]` to see where a bundled gem is installed.
Post-install message from haml:

HEADS UP! Haml 4.0 has many improvements, but also has changes that may break
your application:

* Support for Ruby 1.8.6 dropped
* Support for Rails 2 dropped
* Sass filter now always outputs <style> tags
* Data attributes are now hyphenated, not underscored
* html2haml utility moved to the html2haml gem
* Textile and Maruku filters moved to the haml-contrib gem

For more info see:

http://rubydoc.info/github/haml/haml/file/CHANGELOG.md5.本来Rails默许支持的是内置的Sqlite3数据库,无需安装,但是这个项目为了后期与Heroku更好接轨,使用的是postgresql这个数据库。荣幸的是,Cloud9为我们预装好了Postgresql数据库,我们只需要在终端中输入sudo service postgresql start,就可以启动postgresql数据库。
此时我们如果直接建表的话,会报关于编码的毛病:PG::Error: ERROR: new encoding (UTF8) is incompatible,根据这里,我们在终端中逐行运行下面代码来解决上面的问题:
//进入postgresql数据库
pengzhaoqing:~/workspace (master) $ psql
psql (9.3.14)
Type "help" for help.

ubuntu=# UPDATE pg_database SET datistemplate = FALSE WHERE datname = 'template1';
UPDATE 1
ubuntu=# DROP DATABASE template1;
DROP DATABASE
ubuntu=# CREATE DATABASE template1 WITH TEMPLATE = template0 ENCODING = 'UNICODE';
CREATE DATABASE
ubuntu=# UPDATE pg_database SET datistemplate = TRUE WHERE datname = 'template1';
UPDATE 1
ubuntu=# \c template1
You are now connected to database "template1" as user "ubuntu".
template1=# VACUUM FREEZE;
VACUUM
template1-# \q6.准备好数据库后,我们用以下指令建立表:
pengzhaoqing:~/workspace (master) $ rake db:create:all然后运行数据迁移:
pengzhaoqing:~/workspace (master) $ rake db:migrate
== 20160818081955 CreateUsers: migrating ======================================
-- create_table(:users)
   -> 0.0328s
-- add_index(:users, :email, {:unique=>true})
   -> 0.0081s
== 20160818081955 CreateUsers: migrated (0.0412s) =============================

== 20160907152104 CreateCourses: migrating ====================================
-- create_table(:courses)
   -> 0.0117s
== 20160907152104 CreateCourses: migrated (0.0118s) ===========================

== 20160909105514 CreateGrades: migrating =====================================
-- create_table(:grades)
   -> 0.0192s
== 20160909105514 CreateGrades: migrated (0.0194s) ============================
最后写入种子数据:
pengzhaoqing:~/workspace (master) $ rake db:seed7.点击IDE上面的Run Project按钮,在log里会显示网站的地址,点击这个网址就可以进入项目的演示页面:
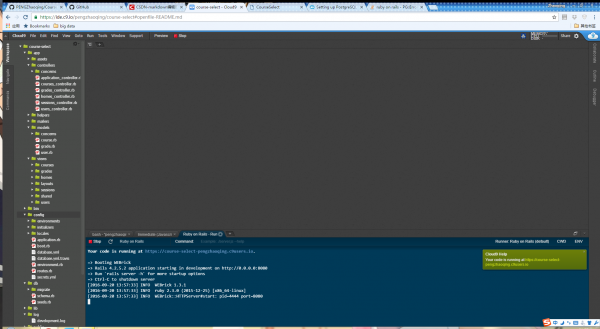
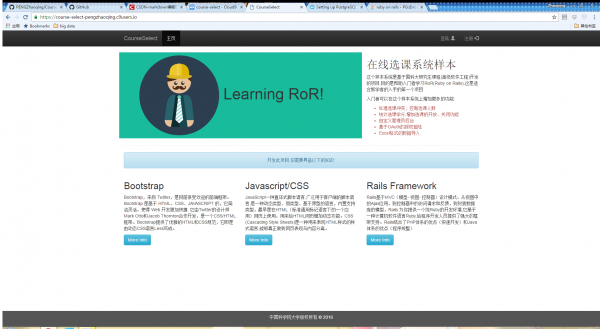
到这里,这个项目就算是跑通了,关于项目更多详细请看这里,下面将会分解这个项目,从零开始写起。
觉得项目好的话,在Github右上角给项目点颗星吧~
